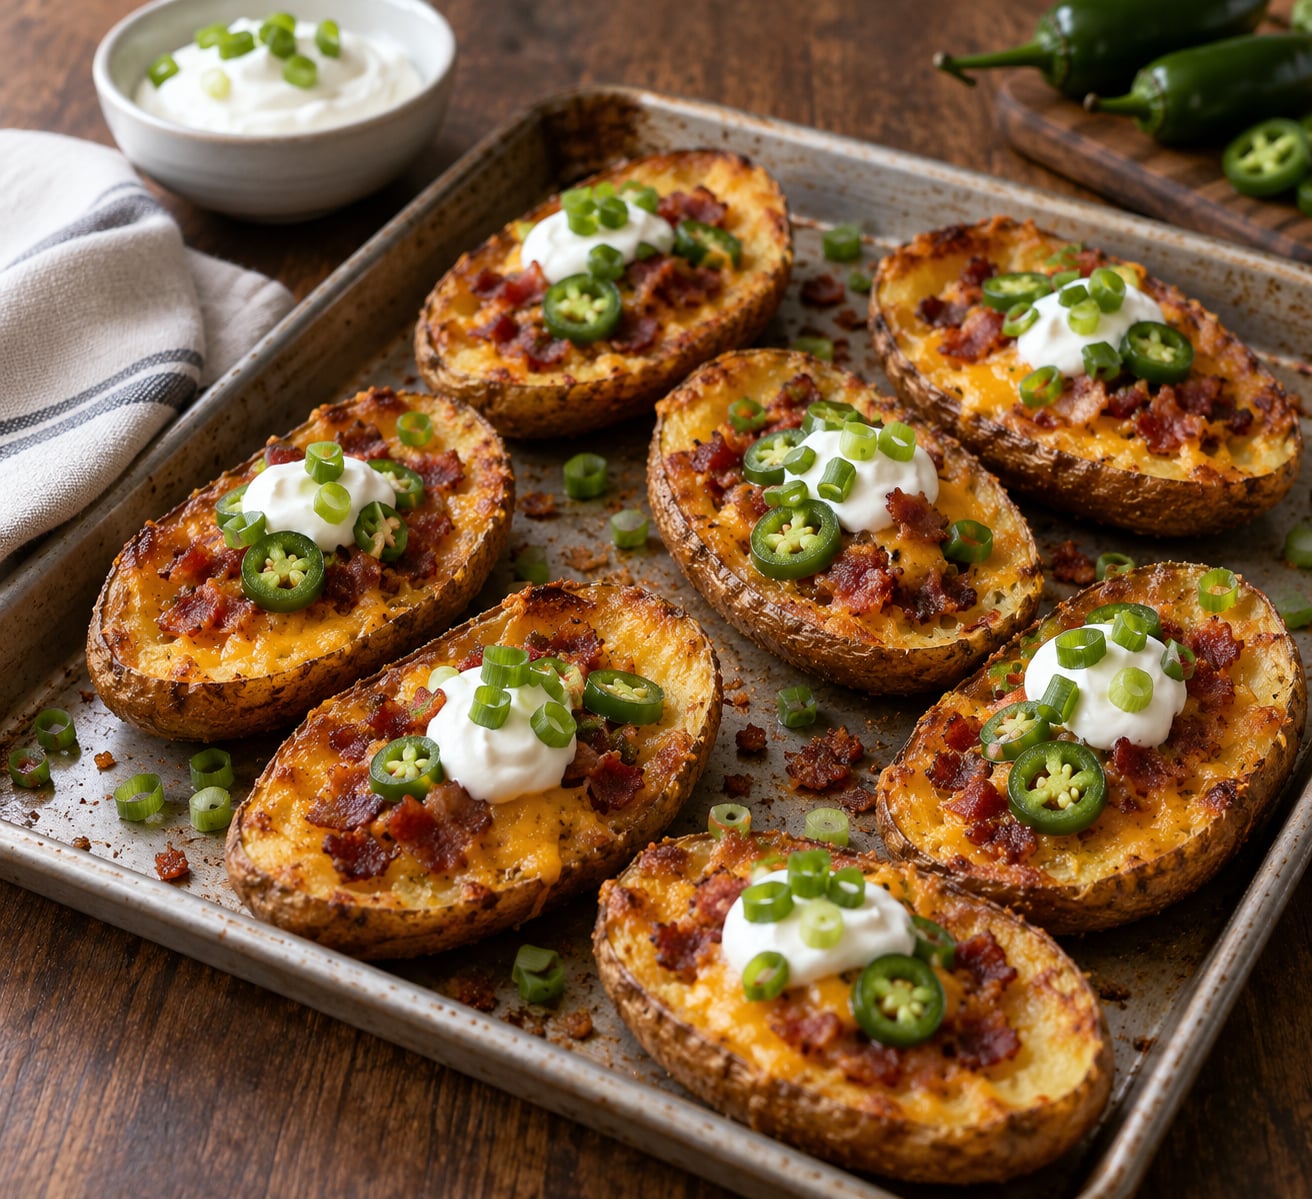
The reliable way to make loaded potato skins with a real crunch starts with whole russet potatoes baked until fork-tender, then halved, hollowed, and roasted cut-side down at high heat so the skins dry out and crunch. You fill them with shredded cheese and crumbled bacon, then give them a final short bake to melt everything into a bubbly, snackable shell.
The whole thing takes about 75 minutes for four servings, and most of that time is hands-off. The one moment that matters is the second, high-heat roast of the empty shells. Skip it or rush it and the skins come out chewy, which is the single most common complaint people have with potato skins. Get that step right and the rest is assembly.
Table of Contents
- What You Need
- The potatoes
- Pantry staples
- For the filling
- Optional pub-style additions
- How to Make Loaded Potato Skins
- Step-by-Step
- 1. Bake the Potatoes Until Tender
- 2. Scoop and Season the Potato Centers
- 3. Crisp the Potato Shells
- 4. Fill and Top the Shells
- 5. Melt the Cheese and Finish Baking
- 6. Rest, Garnish, and Serve
- Oven, air fryer, toaster oven, or convection
- Common Mistakes and Helpful Tips
- Soggy or chewy shells
- Split skins or shells that fall apart
- Shells that will not sit flat
- Greasy cheese that softens the crunch
- Toppings that burn before the cheese melts
- Potatoes that were still firm
- Make-ahead, storage, and reheating
- What to do with the scooped-out flesh
- Topping combinations worth trying
- Frequently Asked Questions
- Do you wrap potatoes in foil when making loaded potato skins?
- Can I make loaded potato skins ahead of time?
- How do I keep loaded potato skins from getting soggy?
- What can I use instead of sour cream?
- How long should I reheat loaded potato skins?
- Are loaded potato skins freezer-friendly?
- Conclusion
What You Need
You need very little to make loaded potato skins work, which is why they show up on pub menus and party trays with so little effort. Everything below makes four servings, or eight loaded halves.
The potatoes
- 4 large russet or Idaho baking potatoes. Scrub them well under running water. You are keeping the skin on, and a quick scrub removes the dirt without costing you any of it.
- Nothing else for the base. Butter and oil go on later, once the shells are hollow.
Russet is the right call because of starch content and skin thickness. The flesh is dry enough to fluff and the skin is thick enough to survive being hollowed. Yukon Gold and red potatoes bake softer and wetter, and they tend to wrinkle and tear when you scoop them.
Pantry staples
- 3 tablespoons olive oil or melted butter, divided between the shells and the pan.
- Salt and black pepper, plus 1/2 teaspoon garlic powder and 1/4 teaspoon onion powder for the shells.
- Bacon grease, optional, to replace some or all of the oil if you have it in the fridge.
For the filling
- 1 to 1 1/2 cups shredded cheddar. Sharp cheddar melts well and adds flavor. Colby, Monterey Jack, smoked gouda and a Monterey Jack and cheddar blend all work.
- 6 to 8 slices bacon, cooked crisp and crumbled.
- 1/2 teaspoon smoked paprika or chili powder, to season the scooped-out centers before they go back in.
- Sour cream, for finishing, about 1/2 cup.
- 1 bunch green onions or scallions, thinly sliced, plus a few chives if you have them.
Avoid pre-shredded cheese with anti-caking powder as the finishing layer. It often releases extra oil, and that oil is what turns a crisp shell soft again. Block cheese you grate yourself melts cleaner.
Optional pub-style additions
- Pickled jalapenos or banana peppers
- Leftover chili or pulled pork
- Salsa or pico de gallo, added after baking
- Buffalo sauce or a drizzle of hot honey
- Ranch or blue cheese dressing for dipping
Equipment is minimal: a fork, a small spoon or melon baller, a knife, a pastry brush or paper towel for the oil, and a heavy baking sheet. A rimmed sheet or a pizza pan works well because the shells can wobble before they crisp.
How to Make Loaded Potato Skins
Here is the shape of the process before you start. It comes down to three bakes and one quick change in temperature.
- First bake: whole potatoes at 425F for 45 to 60 minutes, until a knife slides in with no resistance.
- Second bake: hollowed, oiled shells cut-side down at 450F for 12 to 15 minutes, until the cut edges look dry and darkened.
- Third bake: filled shells at 425F for 8 to 12 minutes, until the cheese is fully melted and lightly blistered. Two or three minutes under the broiler works too, if you are standing right there.
Total time runs about 75 minutes with 20 minutes of that spent cooling the potatoes before you can handle them. Scaling up for a crowd does not add much hands-on work, since the shells can roast on two pans at once.
The one tricky moment is telling the shells apart from leather. Look at the cut edges rather than the skin side. Dry, matte, slightly browned edges with a curled look mean crisp. Translucent, glossy, pale edges mean there is still water in there, and they need another five minutes.
Step-by-Step
1. Bake the Potatoes Until Tender
Heat the oven to 425F. Stab each potato six or eight times with a fork so steam can vent, and lay them directly on the middle rack. Baking them on the rack rather than a tray lets moisture escape instead of pooling underneath.
Bake for 45 to 60 minutes depending on size. Test with a skewer or knife inserted into the thickest part: it should slide through the center with no resistance at all. If you meet any drag, give it another five minutes.
Let the potatoes cool for 15 to 20 minutes. They are much easier to cut when the flesh has set slightly, and you will avoid burning your hands on steam that escapes the moment you cut them.
2. Scoop and Season the Potato Centers
Cut each potato in half lengthwise. One half has the stringy part running along its length, and that string is usually the reason a loaded skin falls apart, so run the knife down inside it and pull it out with the knife tip. Then place each potato cut-side down on the board and cut a thin flat slice from the bottom so the skin sits flat. Flat shells stay put on the sheet; round ones roll.
Scoop out the flesh with a spoon or a small melon baller, working right against the skin. Leave a layer about a quarter inch thick. This is the part people get wrong in both directions. Scoop too deep and the shell has nothing left to hold, so it splits or crumbles. Scoop too timid and you end up with a baked potato rather than a skin.
Do not throw the flesh away. Season it with salt, pepper, and the smoked paprika or chili powder, then set it aside.
3. Crisp the Potato Shells
Raise the oven to 450F. Brush the shells with olive oil or melted butter on the skin side and the cut side, working the oil into the whole surface. Bacon grease works here too, and it seasons the shell as it crisps.
Arrange the shells cut-side down on the preheated, lightly oiled baking sheet and roast for 12 to 15 minutes. Cut-side down is what gives you the hard, flat, crunchy bottom. Skin-side up crisps evenly too, but the texture is less pronounced.
They are ready when the cut edges look dry and slightly curled and the skin has lost its pale, waxy look. If you have a convection oven, drop the temperature by about 25 degrees and check at the 10-minute mark, since the fan browns the cut edge faster.
For an air fryer, quarter the raw potatoes and cook them at 400F for 18 to 22 minutes until fork-tender before you even get to the shells. Then crisp the hollowed shells at 400F for 7 to 9 minutes, cut-side down, and finish at 375F for 4 minutes once loaded.
4. Fill and Top the Shells
Turn the seasoned potato centers into a rough mix with a fork. A few lumps are good. Wet, mashed-smooth filling slides out of the shell when you pick it up.
Spoon a generous layer back into each shell and press it down with the back of the spoon so it fills the shell and sits just below the rim. Anything mounded above the edge will brown before the rest is hot.
Scatter over the shredded cheese first, then the crumbled bacon, then the pickled jalapenos if you are using them. Cheese goes first because it is the layer that needs direct heat to melt.
Hold sour cream, salsa, chives and green onions until the very end. Wet toppings added before the final bake release steam and moisture into the shell, and that is the second most common reason loaded skins go soft.
5. Melt the Cheese and Finish Baking
Drop the oven back to 425F and bake the loaded shells for 8 to 12 minutes. The cheese is ready when it has lost its wet shine, is bubbling in a few spots, and shows a few browned freckles across the surface.
For speed, set them under the broiler for 2 to 3 minutes instead. Stay at the oven door. Broiled cheese goes from golden to black in under a minute, and the bacon bits on top are the first thing to catch fire.
If you are using leftovers with a lot of moisture in them, chili for instance, add those in the last three minutes rather than before, and blot off any excess liquid first.
6. Rest, Garnish, and Serve
Let the skins sit for 3 to 5 minutes out of the oven. The filling sets slightly during that time, which makes them far easier to pick up without the center sliding out.
Dollop on the sour cream and scatter green onions, chives, or both. Serve hot, straight from a warm platter, with dips alongside. They are best in the first 20 minutes, while the shell still cracks under the cheese.
Oven, air fryer, toaster oven, or convection
If you want to compare methods before you start, these are the settings that work at each stage.
| Method | Bake whole potatoes | Crisp the shells | Melt the filling |
|---|---|---|---|
| Standard oven | 425F, 45 to 60 minutes | 450F, 12 to 15 minutes | 425F, 8 to 12 minutes |
| Convection oven | 400F, 40 to 50 minutes | 425F, 10 to 14 minutes | 400F, 8 to 10 minutes |
| Air fryer | 400F, 18 to 22 minutes | 400F, 7 to 9 minutes | 375F, 4 to 6 minutes |
| Toaster oven | 425F, 50 to 65 minutes | 450F, 10 to 14 minutes | 425F, 6 to 10 minutes |
Toaster ovens run hot and sit close to the element, so give yourself the extra two minutes on the whole-potato bake and keep an eye on the cheese at the end.
Common Mistakes and Helpful Tips
Soggy or chewy shells
The shell was not dried out, or something wet went on too early. Fix it next time by giving the shells a full 15 minutes at 450F, making sure the edges look dry and matte before you fill them. Adding sour cream or salsa before the final bake guarantees a soft shell. Also check that your baking sheet was preheated, since a cold sheet drops the temperature and slows the drying.
Split skins or shells that fall apart
Too much flesh came out with the scoop, or the stringy vein was left in. Leave a consistent quarter-inch lining all the way around, and cut that vein out with the tip of a knife before you scoop. If a shell cracks anyway, patch it with a spoonful of the seasoned centers before baking.
Shells that will not sit flat
Potatoes are round, so the skin rocks on the sheet. Trim a thin slice off the curved bottom of each half so it has a flat face to rest on. Even stable shells come out better, because the hot pan is only crisping the part that is touching it.
Greasy cheese that softens the crunch
Oily and heavily processed cheeses release fat as they melt. Sharp cheddar, Colby, Monterey Jack, gouda, or a real cheese blend grated from blocks are all safer choices. Keep the shell on top of the cheese layer, and skip heavy cheese blankets in favor of a generous but thin layer.
Toppings that burn before the cheese melts
Bacon and thin-sliced toppings are in the blast zone under the broiler. Bake at 425F first, and use the broiler only for the final 2 to 3 minutes. If you want shisito peppers or crisped prosciutto, add them after the cheese has melted.
Potatoes that were still firm
The first bake was cut short, and the centers never softened enough to scoop cleanly, so you had to dig. A knife that meets resistance means more time, not more force. Large russets can take a full 75 minutes.
Make-ahead, storage, and reheating
There are three good checkpoints for doing this ahead.
- Crisp the empty shells and refrigerate them for up to 2 days, or freeze them in a single layer on a tray before bagging. Frozen shells keep for a couple of months.
- Crisp the shells and fill them with cheese and bacon, then refrigerate up to 2 days. Leave the sour cream and green onions off until serving.
- Fully loaded, garnished skins can be refrigerated for 1 day. Re-crisp before serving.
Cooked potato dishes, including loaded potato skins, keep 3 to 4 days in the refrigerator, and reheating needs more than just a microwave to bring back the crunch. From the fridge, bake at 375F for 10 to 12 minutes. From frozen, give them 18 to 20 minutes. In an air fryer, 375F for 5 to 7 minutes does the job.
Skip the microwave unless you are reheating a single skin to eat immediately. The microwave softens the shell and no oven step afterward fully brings it back.
What to do with the scooped-out flesh
One batch of four potatoes gives you roughly two cups of cooked flesh, which is worth planning around. Mash it with butter and milk for next-day mashed potatoes, fold it into a soup, stir it into pancake batter, or season it heavily and pile it back into the shells as extra filling. It also makes a good thickener for a chowder.
Topping combinations worth trying
- Classic: cheddar, crumbled bacon, sour cream, green onions.
- Buffalo chicken: shredded chicken tossed in buffalo sauce, cheddar, blue cheese crumbles, celery.
- Taco: seasoned ground beef, Mexican blend cheese, jalapenos, and salsa added after baking.
- Steakhouse: chopped steak, sautéed mushrooms, gorgonzola or provolone.
- BBQ pork: pulled pork, coleslaw, sharp cheddar, a drizzle of barbecue sauce.
- Breakfast: scrambled egg, crumbled sausage, hot sauce, chives.
- Pesto: shredded mozzarella, diced tomato, basil pesto added after baking.
- Plant-based: black beans, corn, red onion, chili powder and lime, with shredded coconut flakes crisped in bacon-style seasonings for the top.
Frequently Asked Questions
Do you wrap potatoes in foil when making loaded potato skins?
No. Bake them naked on the oven rack. Foil traps steam around the skin and softens the outside of the potato, which is the opposite of what you want, and it leaves the skin damp when you try to crisp it later. Some people bake foil-wrapped for convenience and then unwrap them for the crisping stage, which works, but straight on the rack is simpler and gives you a drier starting point.
Can I make loaded potato skins ahead of time?
Yes, at several points in the process. Crisp the empty shells and refrigerate them for up to 2 days, or freeze them in a single layer on a tray before transferring to a bag. You can also fill the shells with cheese and bacon a day ahead and hold the sour cream and green onions until serving. Add the wet finishing toppings only in the last few minutes, or the shells will sit soft in the fridge.
How do I keep loaded potato skins from getting soggy?
Three things do most of the work. Give the hollowed shells a full 12 to 15 minutes cut-side down at 450F, and only fill them once the cut edges look dry and matte. Use block cheese you grate yourself rather than oily pre-shredded blends. And keep sour cream, salsa, and other wet toppings off until after the final bake, since trapped steam re-softens a crisp shell fast.
What can I use instead of sour cream?
Greek yogurt is the closest swap, with more protein and less fat, and it works on a filled skin because it does not run as much. Plain Greek yogurt blended with a little lime juice or ranch seasoning reads as a crema. Shredded cabbage with lime and a pinch of salt gives you crunch instead of cream, which suits barbecue pulled pork versions, and a drizzle of garlic herb olive oil works if you want no dairy at all.
How long should I reheat loaded potato skins?
From the refrigerator, bake at 375F for 10 to 12 minutes. From frozen, give them 18 to 20 minutes on a sheet pan. An air fryer at 375F takes 5 to 7 minutes. Cooked potato dishes keep 3 to 4 days refrigerated, so reheat within that window, and skip the microwave because it softens the shell and a quick blast of heat will not fully bring the crunch back.
Are loaded potato skins freezer-friendly?
Freeze them at the shell stage rather than after loading. Once crisp, hollowed shells keep for a couple of months and can bake from frozen without thawing, which is the easiest version for a potluck. Fully loaded skins with cheese and bacon freeze acceptably but reheat better in an oven than a microwave. Add fresh toppings like sour cream, chives, and pickles only after reheating.
Conclusion
Start where most recipes do and where most home cooks go wrong: bake whole russets at 425F until a knife goes through with no resistance, and leave a quarter inch of flesh against the skin when you scoop. That combination, followed by a genuine 15-minute roast at 450F with the shells cut-side down, is what makes the crunch.
Then keep it simple. Sharp cheddar, crumbled bacon, a thin layer, and a final bake at 425F until the cheese bubbles and freckles. Add the sour cream and green onions right before you carry the tray to the table, and serve them hot.