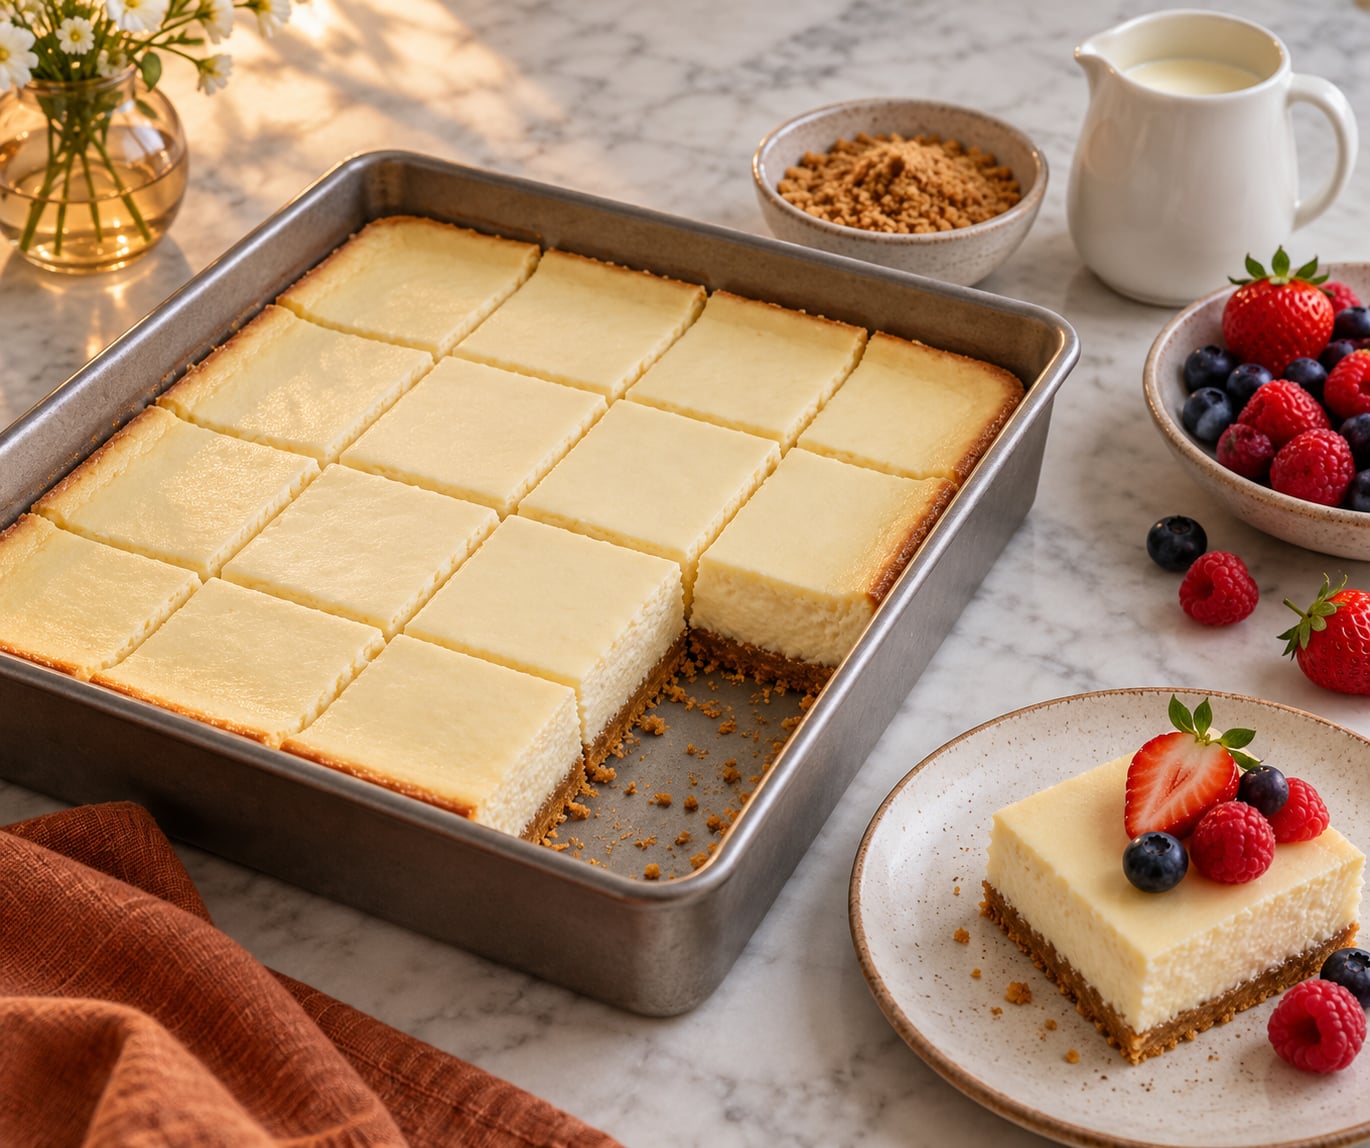
To make cheesecake bars for a party, press a graham cracker crust into a 9-by-13-inch pan, pre-bake it for 10 minutes, then pour over a beaten cream cheese filling and bake at 325°F for 40 to 45 minutes until the edges set and the center still jiggles. Cool on the counter, chill at least 6 hours, then cut into clean squares.
The whole process takes about an hour of hands-on time plus the chill, and it is forgiving enough that first-time bakers usually succeed. No water bath, no springform pan, and no temperamental water leak onto the oven floor.
For a party, cheesecake bars beat a whole cheesecake on almost every practical measure. They bake in a flatter pan so the center sets evenly, they portion in one cut, they travel in a single covered dish, and they hold their texture for hours on a buffet table while a tall cheesecake goes soft and slumps. Bars can also be finished a day ahead, which is the real reason I stopped making whole cheesecakes for get-togethers.
One detail matters more than most people expect when you plan how to make cheesecake bars for a party: the recipe scales cleanly. A single 9-by-13 pan cuts into about 16 generous bars or 24 smaller two-bite squares, so a group of 20 is roughly one and a half pans.
Table of Contents
- What You Need
- Equipment
- Ingredients for a 9-by-13 Pan
- Simple substitutions
- For slicing and transporting
- Step-by-Step
- 1. Prepare the Pan and Graham Cracker Crust
- 2. Mix the Cheesecake Filling
- 3. Bake Until Just Set
- 4. Cool and Chill Completely
- 5. Slice and Serve for a Party
- A note on chilling time
- Common Mistakes
- The filling is watery or weeping
- The crust is rock hard after chilling
- Cracks across the surface
- The filling turned out dense or gummy
- The batter was lumpy
- The slices are ragged and pull apart
- The bars slid around while baking
- How Many Bars Do You Need?
- Flavor Variations and Dietary Swaps
- A Make-Ahead Timeline for Party Day
- Transporting them
- Frequently Asked Questions
- Can I make cheesecake bars the day before a party?
- What pan size should I use for party cheesecake bars?
- How do I know when cheesecake bars are done baking?
- Can I use a different crust for cheesecake bars?
- How should I store leftover cheesecake bars?
- Can I transport cheesecake bars without ruining them?
- Conclusion
What You Need
Equipment
- A 9-by-13-inch metal baking pan, light-colored if you have one
- A roll of parchment paper
- A food processor or a zip-top bag and rolling pin for the crumbs
- A stand mixer or hand mixer with a paddle or flat beater
- An instant-read thermometer for the doneness check
- A wide spatula and a small offset spatula for the crust
- A long sharp knife for cutting
Metal beats glass here. Glass pans hold heat differently and bake slower, which is how you end up with a dry edge and a center that never quite sets. If glass is all you have, add about 5 minutes to the bake and pull it while the center still wobbles.
Ingredients for a 9-by-13 Pan
- 2 cups graham cracker crumbs, about 15 full sheets
- 6 tablespoons unsalted butter, melted and cooled slightly
- 2 tablespoons granulated sugar for the crust
- 32 ounces full-fat cream cheese, four 8-ounce blocks, at room temperature
- 1 cup granulated sugar
- 2 tablespoons all-purpose flour
- 4 large eggs, room temperature
- 3/4 cup sour cream
- 2 teaspoons vanilla extract
- 1 teaspoon lemon juice
- 1/4 teaspoon fine salt
Full-fat cream cheese is non-negotiable for this recipe. Reduced-fat versions carry more water and less fat, and that combination is the single most common reason a homemade batch turns weepy on the cutting board. Philadelphia blocks work well because the texture is even, but any full-fat brand that comes in blocks rather than a tub will do.
Bring the cream cheese, eggs and sour cream to room temperature before you turn the mixer on. That means roughly 60 to 90 minutes on the counter. Cold cream cheese will not smooth out, and trying to beat the lumps out of it just warms the outside while the middle stays solid.
Simple substitutions
Swap graham crackers for any cookie crumb you like. Shortbread, chocolate wafers, Biscoff, or crushed pretzels all work, and the crust only needs something that holds together when pressed. For a gluten-free version, use a gluten-free cookie crumb and confirm your cream cheese and sour cream are free of gluten binders.
Out of sour cream? Use plain Greek yogurt stirred until smooth, or full-fat heavy cream with a tablespoon of lemon juice. Both give you the tang and the moisture that keeps the filling from getting tacky.
The flour is easy to miss and worth keeping. A couple of tablespoons give the filling a little more structure so it slices cleanly instead of folding over on the spatula.
For slicing and transporting
A long chef’s knife dipped briefly in hot water and wiped dry between every cut is the whole trick. Beyond that, keep a rigid container with a tight lid, a few ice packs, and a flat board or platter that fits in your car. Parchment sheets between layers matter more once you have cut than before.
Step-by-Step
1. Prepare the Pan and Graham Cracker Crust
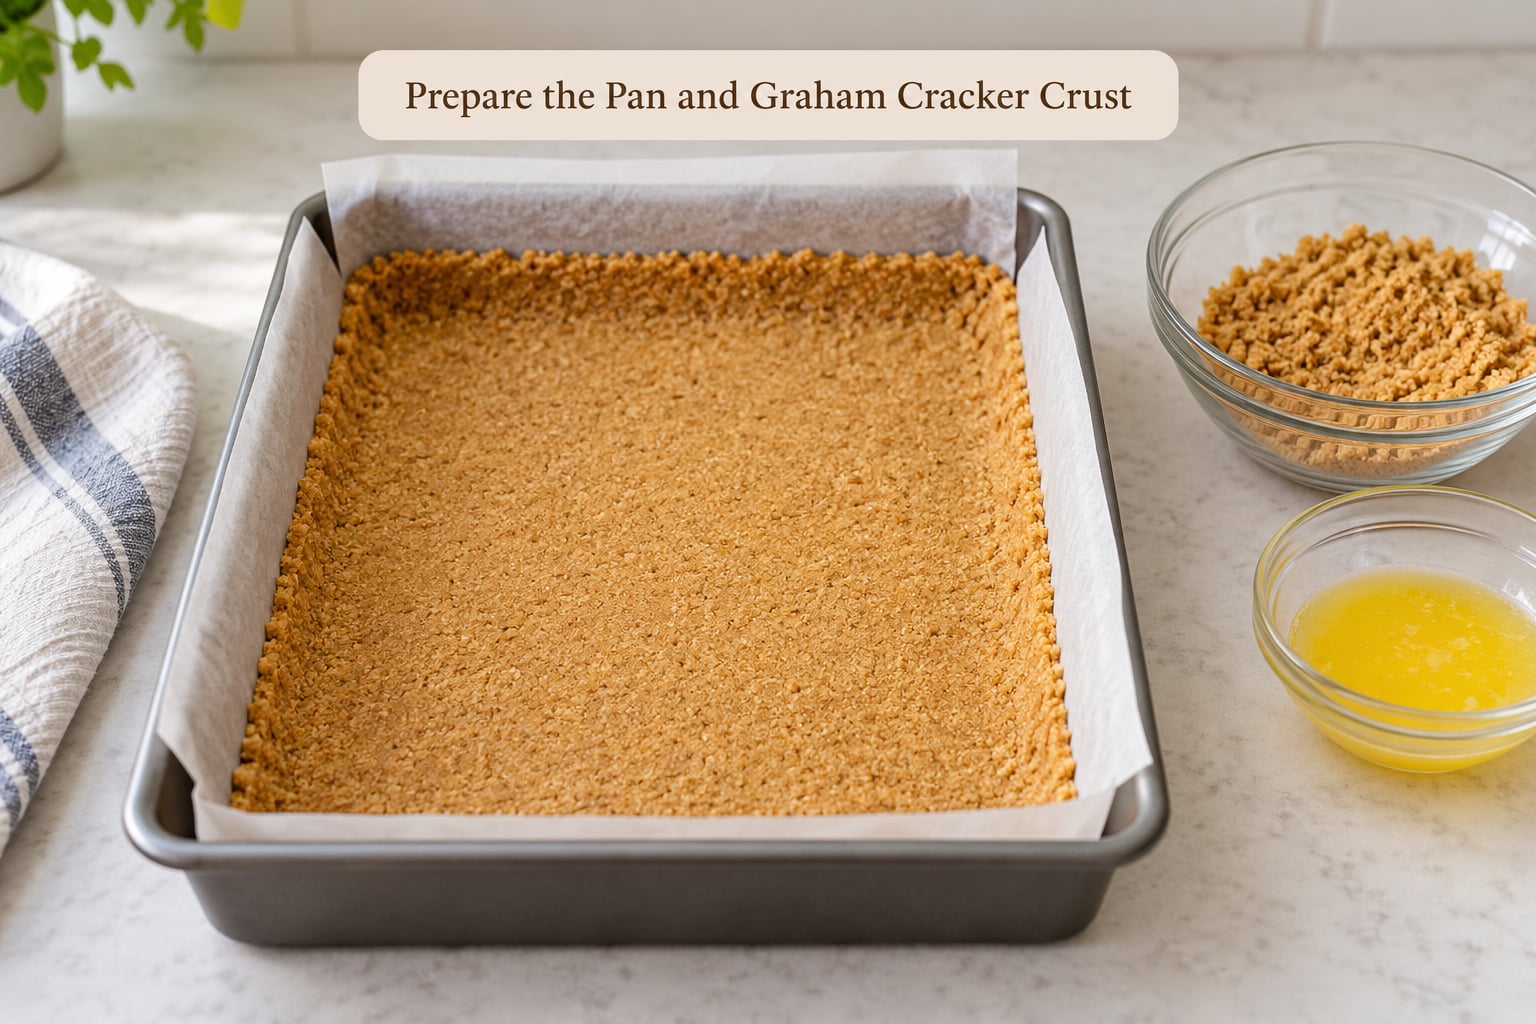
Heat the oven to 325°F. Cut a sheet of parchment long enough to drape over the two long sides of the pan, press it into the corners, and let the overhang hang. That overhang is your handle later, and it is the reason bars release cleanly instead of shattering into the pan.
Pulse the graham crackers in a food processor until they are fine crumbs, about 10 to 15 pulses. If you have no processor, crush them in a zip-top bag with a rolling pin. Toss the crumbs with the 2 tablespoons of sugar, pour the melted butter over, and pulse or stir until the mixture holds together when you pinch it.
Empty the crumbs into the pan and press firmly and evenly with the bottom of a measuring cup. Compact crumbs are the difference between a buttery crust that shatters under a fork and one that holds under a fork. Spend the extra minute here.
Bake the crust for 10 minutes, until it looks dry, smells toasty, and holds together when you press a corner. Let it cool for at least 15 minutes. Pouring filling onto a hot crust melts the butter and gives you a soggy base, so this pause is not optional.
2. Mix the Cheesecake Filling
Beat the softened cream cheese on medium speed for 2 to 3 minutes, scraping the bowl twice, until it is completely smooth with no lumps. Scrape the bowl and add the sugar, flour and salt, then beat for another minute until the mixture looks glossy.
Add the eggs one at a time, beating on low speed only until each disappears. This is where people ruin the texture. High speed whips air into the batter, and that air expands in the oven and leaves you with a dense, gummy block instead of something creamy.
With the last egg incorporated, add the sour cream, vanilla and lemon juice. Beat just until smooth, about 30 seconds, and stop. The lemon juice is not for flavor you will notice; it sharpens the tang so the dessert does not read as pure sweetness.
3. Bake Until Just Set
Pour the filling over the cooled crust and smooth the top with the spatula. Bake at 325°F for 40 to 45 minutes.
You are looking for three things at once. The edges should be puffed and matte, slightly darker than the center. The whole pan should jiggle as one mass when you nudge the rack, not ripple like liquid. And the center should still wobble when you shake the pan gently.
If you want numbers, an instant-read thermometer in the center should read 150 to 155°F. That is the temperature where the filling has set enough to slice and chilled enough to stay creamy. Going past 160°F is where cracks and dryness start showing up.
If the edges are browning heavily before the center sets, drape a loose piece of foil over the pan. Cheesecake bars carry no water and burn from the top down far more easily than a tall cake does.
4. Cool and Chill Completely
Set the pan on a wire rack and let it cool at room temperature for about an hour, until the top stops feeling warm. Then cover it and refrigerate for at least 6 hours. Overnight is better, and overnight is what I do when the party is the next evening.
Cooling in the pan is doing real work here. The filling finishes setting around the crust as the heat leaves, and the bars firm up into a shape you can lift out in one piece. Moving warm bars to the fridge gives you condensation and a loose, sticky surface instead.
5. Slice and Serve for a Party
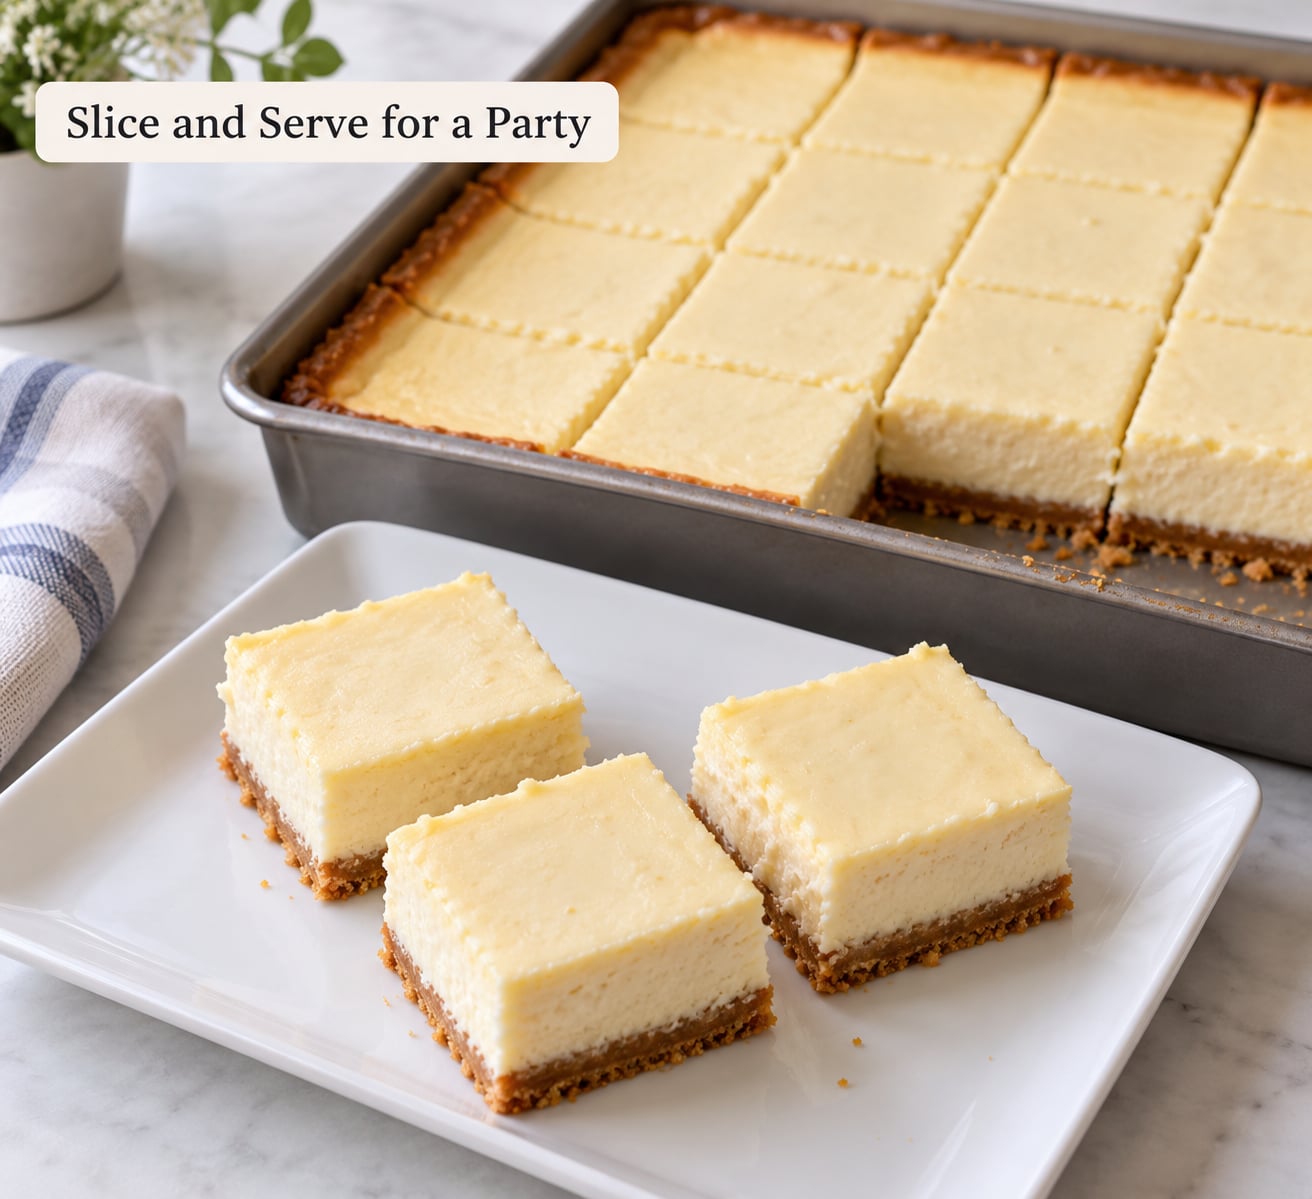
Lift the chilled slab out using the parchment handles and slide it onto a board. Wipe a long knife with a hot damp cloth, cut straight down, and wipe again between every single cut. A clean blade plus a cold dessert gives you sharp squares with no tearing.
Cut in the pan and score the top lightly with the knife before lifting, if you would rather not move the slab at all. For a 9-by-13 pan, a 4-by-4 grid gives 16 generous bars; a 4-by-6 grid gives 24 smaller ones.
Cover leftovers loosely and refrigerate them. Use them within 3 to 4 days, and keep the total time at room temperature under 2 hours, or under 1 hour if the party is somewhere hot.
A note on chilling time
Six hours is the practical minimum. Four hours gives you a set that holds its shape but still feels slightly loose in the middle, and the first person to take a bar may get a sticky thumb.
Common Mistakes
The filling is watery or weeping
Almost always one of three causes: reduced-fat cream cheese, an underbake, or both. Switch to full-fat blocks and pull the pan at 150°F rather than waiting for the center to look completely firm. A cheesecake that still trembles slightly at room temperature turns silky after chilling.
The crust is rock hard after chilling
You pressed too hard, packed it too thick, or used too little butter. The crust should be about 1/4 inch thick, pressed firmly but not compacted into a brick. Aim for the crumbs to look damp and slightly darkened as you press, not dry and powdery.
Cracks across the surface
Baking too long and dropping temperature too fast. Pull the bars at the first sign of a matte top, let them cool gradually in the pan, and avoid putting the pan directly into a cold fridge. A single wide crack is normal in home ovens and does not affect texture.
The filling turned out dense or gummy
The mixer ran at high speed while the eggs went in. Air becomes structure becomes rubber at higher temperatures. Add the eggs one at a time on low, and stop the moment the last one disappears.
The batter was lumpy
The cream cheese was still cold, or it went into the bowl straight from the fridge. Give it 60 to 90 minutes out. If you already started, push the lumps through a sieve rather than trying to beat them smooth, which only warms the outer edges.
The slices are ragged and pull apart
A dull knife or a warm dessert. Dip and wipe between cuts, and cut when the bars are properly cold. A thin layer of parchment under your serving board helps if you are plating rather than displaying in the pan.
The bars slid around while baking
Parchment needs to be pressed firmly into the corners and the pan greased underneath. A flat sheet floating on a slick surface is enough to shift everything a half inch, which is enough to look sloppy.
How Many Bars Do You Need?
Budget two bars per person for a party with other desserts on the table, or three if the bars are the main event. Everyone assumes one is enough, then takes a second one standing up in the kitchen.
- 9-by-9-inch square pan, cut 3-by-3: about 9 generous bars, serves 3 to 4
- 9-by-13-inch pan, cut 4-by-4: about 16 generous bars, serves 6 to 8
- 9-by-13-inch pan, cut 4-by-6: about 24 smaller bars, serves 10 to 12
- Two 9-by-13 pans: about 32 to 48 bars, serves 16 to 24
- Three 9-by-13 pans: about 48 to 72 bars, serves 24 to 36
For a crowd over 20, bake two pans rather than trying to bake one enormous one. A larger pan means a thicker filling layer that takes longer to set through the middle, and that middle is where the bars fail.
To double the recipe, beat the filling in two batches rather than one. A stand mixer running at full tilt for four blocks of cream cheese pushes the bowl temperature up and softens the butter in the crust you have already pressed.
Flavor Variations and Dietary Swaps
Each of these starts from the base recipe above. Change one or two things, not everything, so the texture stays dependable.
- Classic vanilla: the base recipe as written, finished with a light dusting of powdered sugar.
- Lemon: add the zest of 2 lemons along with the juice, and swap the crust for shortbread crumbs.
- Chocolate swirl: melt 4 ounces dark chocolate and fold in the last cup of batter, alternating spoonfuls with the plain batter for a marbled look.
- Berry: stir 1 cup of seedless raspberry jam into the filling and ripple with a knife. Thin the jam with a teaspoon of water first so it does not bleed.
- Caramel: spread cooled caramel sauce over the chilled bars and add a pinch of flaky salt. Add it after baking, not before, so the topping stays glossy.
- Cookies and cream: crush 10 sandwich cookies into fine crumbs and fold half into the filling, half over the top just before serving.
For a gluten-free crowd, replace the graham crumbs with a gluten-free cookie crumb and check that your cream cheese and sour cream contain no wheat-based thickeners. The rest of the recipe needs no change.
To cut the sugar, reduce the filling sugar by a quarter cup. Do not reduce it by more than that, or the bars will taste flat and set softer. Cornstarch replaces the flour cleanly if you want a slightly silkier texture.
A Make-Ahead Timeline for Party Day
Cheesecake bars want to be made earlier than most desserts, which is the one scheduling advantage a party dessert can have. A simple plan:
- Two days before: bake the bars. Cool fully, cover, and refrigerate. This is also a fine day to set out pans, a knife and the platter.
- The day before: slice while cold, then cover the tray. Keep it at the back of the fridge where nothing warm sits beside it.
- Party morning: make any topping that keeps well, such as caramel or a fruit compote. Warm berry toppings fresh in a small pan so they are not watery.
- One hour before serving: take the tray out of the fridge, add the topping, and let it sit for 30 to 45 minutes. Bars straight from the fridge taste flat.
- Serving: set out forks and plates instead of serving tongs, since bars crumble when people try to pick them up with tongs.
Transporting them
Carry the bars in one rigid container with a tight lid, layers separated by parchment, and a towel packed around the sides so nothing shifts. Keep the container level in the car, not on a seat where a turn will tip it.
For anything longer than a 20-minute drive, put the container in a cooler with ice packs and keep it closed. Cheese desserts should not sit unrefrigerated for more than 2 hours in total, and a parked car reaches temperatures that cut that limit considerably.
Once you arrive, put the tray in the fridge and set a timer for 30 minutes before you plan to serve. That is enough time to come up to serving temperature without going warm.
Frequently Asked Questions
Can I make cheesecake bars the day before a party?
Yes, and that is the recommended timing. Bake the bars, let them cool completely on a wire rack, then cover and refrigerate overnight. They actually benefit from the long chill because the filling firms up and slices more cleanly. Add any fresh topping, fruit or caramel sauce on the day of the party rather than the night before.
What pan size should I use for party cheesecake bars?
Use a 9-by-13-inch pan for most parties. Cut into 16 generous bars for a group of 6 to 8, or 24 smaller squares for 10 to 12 people. A 9-by-9-inch square pan works for small gatherings, but any deeper or larger pan gives a thicker filling that takes longer to set through the middle.
How do I know when cheesecake bars are done baking?
Look for puffed, matte edges that are slightly darker than the center, and a pan that jiggles as one mass when nudged. The center should still wobble. If you have an instant-read thermometer, 150 to 155°F in the middle is the target. Baking past 160°F is when the filling turns dry and cracks.
Can I use a different crust for cheesecake bars?
Any crumb crust works as long as it holds together when pressed. Shortbread, chocolate wafer cookies, Biscoff biscuits and crushed pretzels are all reliable options. Keep the same 2 cups of crumbs and 6 tablespoons of melted butter ratio, press firmly but not hard, and pre-bake for 10 minutes before adding the filling.
How should I store leftover cheesecake bars?
Cover the tray or transfer the bars to an airtight container and refrigerate them. Use them within 3 to 4 days. For longer storage, wrap individual bars in plastic wrap, freeze them flat on a sheet pan, then move them to a freezer bag where they keep for about two months and thaw best overnight in the fridge.
Can I transport cheesecake bars without ruining them?
Carry them in one rigid container with a tight lid, layers separated by parchment, and a towel packed around the sides so nothing shifts. Keep the container level and cold, and put it in a cooler with ice packs for trips over 20 minutes. Total time at room temperature should stay under 2 hours.
Conclusion
Bake your cheesecake bars two days before the party, chill them overnight, and slice them the morning of the day. Use full-fat cream cheese at room temperature, bake at 325°F until the edges puff and the center still jiggles, and let the pan cool on the counter before it goes in the fridge. Portion the bars early, cover them, and pull them out of the fridge 30 to 45 minutes before serving so they are not too cold to eat.