To make clear ice at home without a machine, freeze water slowly in an open container with the sides and bottom insulated, so heat escapes only through the top and pushes trapped air down and out. The simple version takes a day or two in the freezer and costs almost nothing.
The cloudiness in an ordinary ice cube tray is not a defect. Water from the tap carries dissolved gases and minerals, and when a tray freezes from every side at once, those get locked into the middle as a white core. A tray also freezes fast, which is the real enemy of clarity.
I have made clear ice two ways: directional freezing in an insulated cooler, and a reusable block made from a frozen hollow core. The reusable block is the one to try if your kitchen does not have a cooler or a spare freezer. Both are described step by step below, with the fixes for the problems that come up most.
Clear ice is denser than cloudy ice, so it melts more slowly and dilutes a drink less. On a whiskey neat or an Old Fashioned, that difference is obvious within a few minutes. It also looks better, which is most of the point.
Table of Contents
- What You Need
- Step-by-Step: How to Make Clear Ice at Home
- Fill the Molds and Freeze Slowly
- Create an Empty Frozen Core
- Add Water and Freeze the Block
- Remove the Ice Without Breaking It
- Common Mistakes
- How to Keep Clear Ice Clear
- Common Mistakes and How to Fix Them
- White cloudiness through the middle of the cube
- A ring of trapped bubbles around the top
- A cracked bowl or a shattered block
- Ice fused to the container
- A block that froze unevenly, clear on one end and white on the other
- Frequently Asked Questions
- Can I make clear ice with a regular ice cube tray?
- Is it safe to make ice in a glass bowl?
- Why does my ice have a cloudy white center?
- Do I need filtered or distilled water for clear ice?
- What is the best clear ice to use for cocktails or parties?
- Conclusion
What You Need
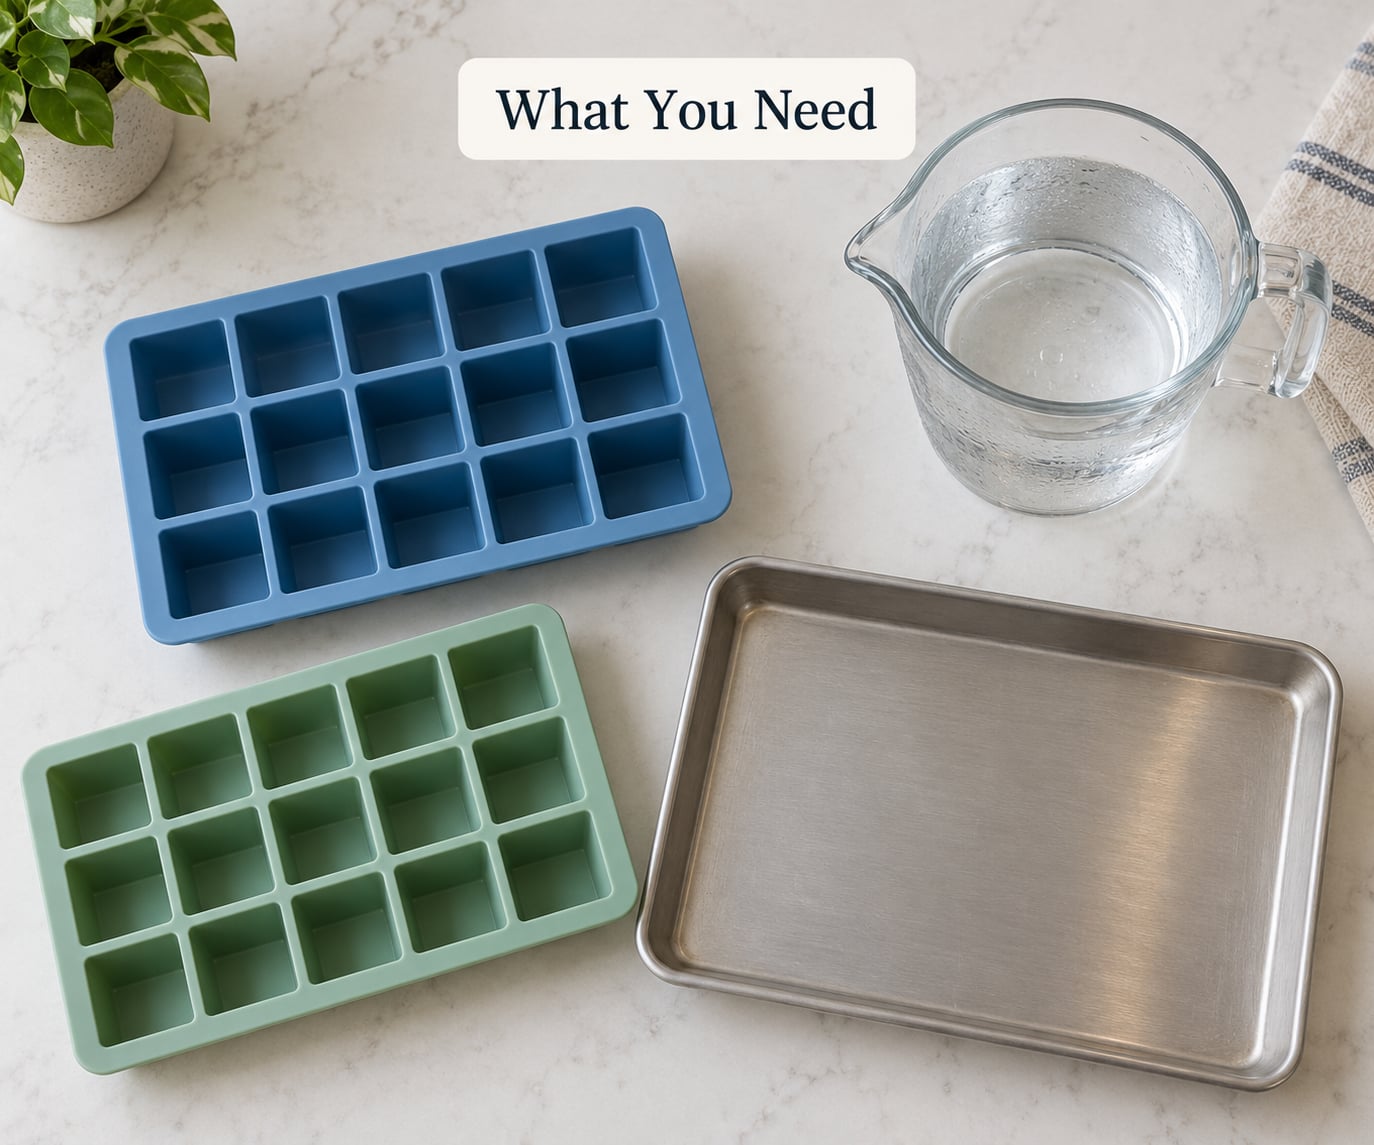
You need very little, and most of it you probably own already.
- An open container with no lid. A shallow metal tray, a loaf pan, a mixing bowl, or a silicone mold all work. The opening is the whole trick, because heat has to leave through the water surface.
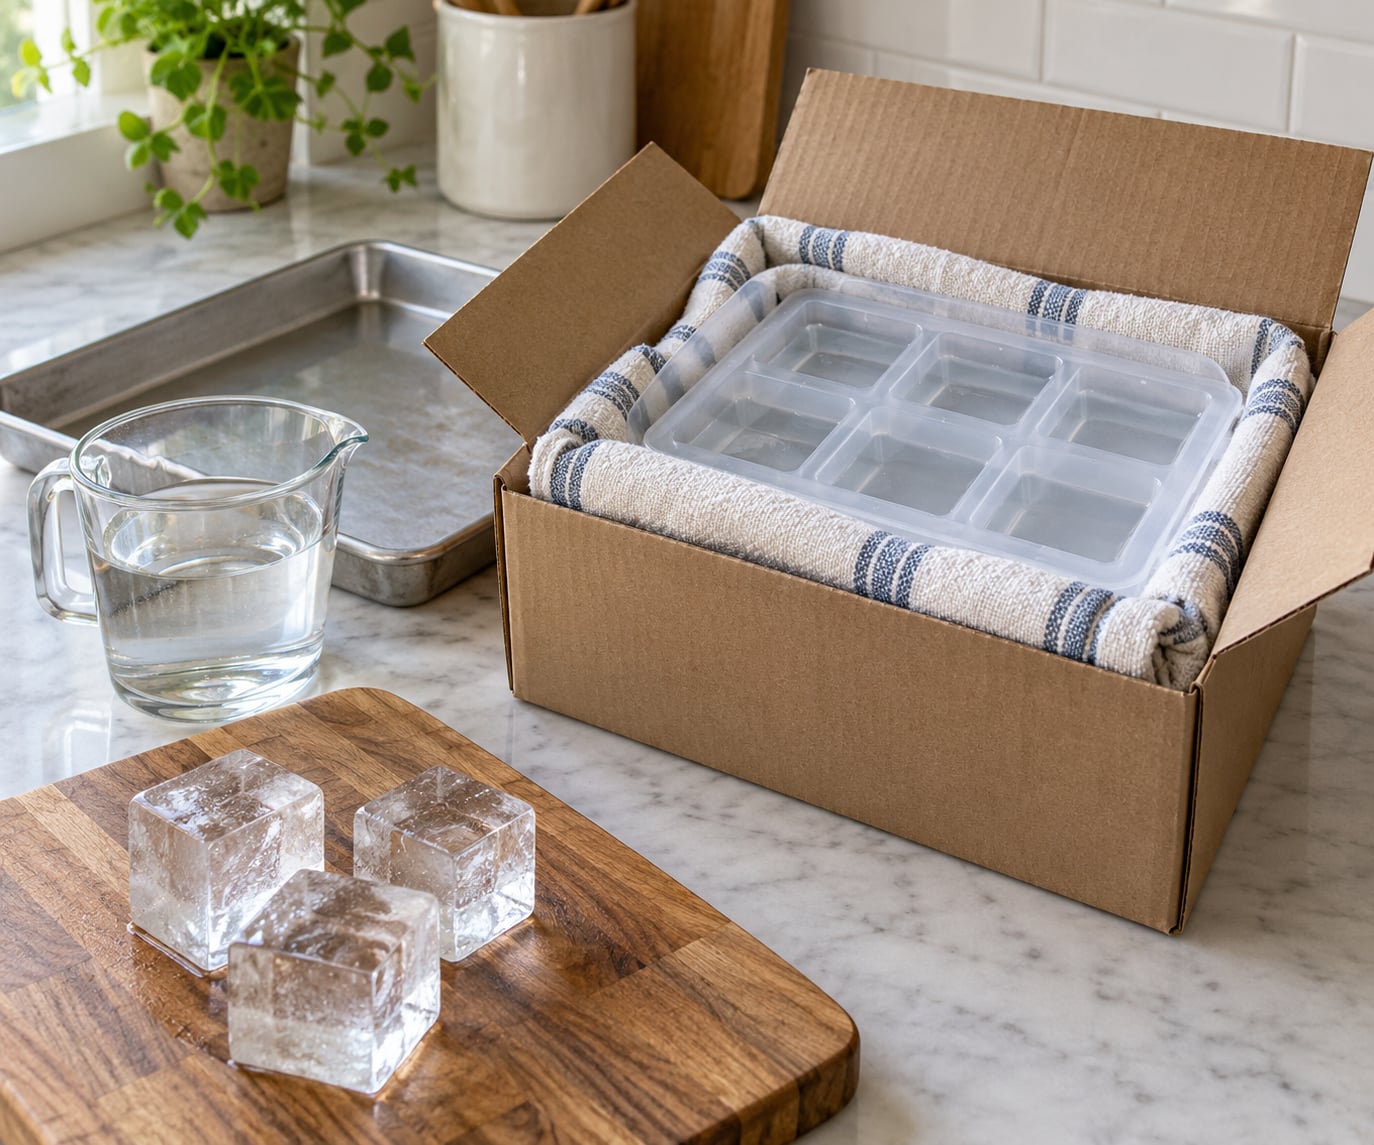
- Something to insulate the sides. A foam cooler is ideal, but a towel wrapped around the container and tucked into a cardboard box works nearly as well.
- Water. Cold tap water is fine to start. Distilled or filtered water gives you a clearer result, and it also removes chlorine taste from a drink served neat.
- A drain or tray. The reusable-block method makes a lot of overflow water, and you want it going somewhere other than your freezer floor.
For the block method, add a heat-safe bowl or silicone mold wide enough to sit inside your larger container, plus a knife and a cutting board for later. A freezer thermometer is optional, though it helps if you have never timed a freeze in your own freezer.
Two material notes. Silicone and plastic are forgiving and handle the expansion of freezing water well. Thick glass can crack if you pour very hot water into it cold, or if you drop a frozen bowl on a hard floor, so temper glass bowls with cool water before turning them out.
Step-by-Step: How to Make Clear Ice at Home
Fill the Molds and Freeze Slowly
Fill each container about three-quarters full with cold water, leave the rest empty, and set it where cold air can still move around it.
Leave roughly a quarter of the depth empty because water expands as it freezes, and a full container will bulge or split. That headroom is also where the dirty layer collects before you chip it away.
Then slow the freezing down. Wrap the sides and base in a towel and drop the container into a box or cooler, keeping the top wide open. Slower freezing gives the water time to push dissolved gases upward and out before the crystal lattice locks around them. This is the step where most versions of how to make clear ice at home quietly go wrong, because people fill the tray, slide it onto a shelf and walk away.
Where the freeze happens decides where the cloud ends up. Freeze from the top down and impurities collect in the last liquid layer at the bottom. Freeze from every side at once and they collect in the middle, which is why tray ice has a white core.
Leave the freezer alone once the containers are in. Opening the door repeatedly pushes warm, moist air into the box, and each interruption resets the slow, steady freeze you are trying to protect.
Create an Empty Frozen Core
For the reusable block, freeze an open bowl or tray on its own until it becomes a hollow shell of ice, then turn that shell out intact.
Fill the bowl with water and freeze it uncovered until solid, usually four to six hours for a shallow tray and overnight for something deeper. You are looking for a shell with a hollow middle and at least an inch of thickness on the base, because a thin wall cracks when you handle it.
To check readiness, run lukewarm tap water over the outside of the bowl for ten to fifteen seconds. The surface will frost over and pull slightly away from the container. Tip the bowl upside down over the sink and the shell should drop into your hand rather than shatter.
If it cracks, freeze a thicker shell next time. Thin shells look promising and fail halfway through the process, which wastes a day.
Add Water and Freeze the Block
Set the hollow core inside your outer container, fill it with cold water through the open top, and freeze the whole assembly together until solid.
The core does two jobs at once. It insulates the water sitting inside it, so that center freezes last, and it leaves an open channel that lets you pour more water in as the level drops. Leave the top uncovered so that channel stays clear.
Set the container in a drain tray or the sink and expect water to overflow as the block grows. A two-quart block takes somewhere around a day; a larger cooler-sized block runs closer to two days. Treat those as rough guides rather than promises, because freezer temperature, starting water temperature and cube size all shift the timing.
Worth doing, from what I have seen on the cocktail forums: refrigerate the distilled water first, let it sit a minute after pouring it out, then fill the core. Cold water that starts at an even temperature tends to freeze more evenly and leaves fewer trapped bubbles.
Remove the Ice Without Breaking It
Loosen the block, temper the outside briefly, and take out only the piece you need for the drink you are making.
Run lukewarm water over the outside of the container for about fifteen seconds, then invert it onto a cutting board set in the sink. If the block resists, keep running water rather than hitting it with a knife or prying at the edge.
Before you cut anything, let the block sit at room temperature for ten to fifteen minutes. Ice taken straight from the freezer is brittle, and a sharp knife at that temperature tends to fracture it into pieces instead of cutting it. A bread knife with a gentle sawing motion, wearing gloves, is the safest approach.
Return the remainder to the freezer in its container and avoid stacking anything on top of it. Each time you fill and freeze it again, the surface gets rougher and the block grows a little less regular, so plan on three or four good cubes before you start trimming.
Common Mistakes
Fast freezing, covered molds, hard tap water and overfilling cause most cloudy results, and each has a simple fix.
Covering the container is the most common mistake, because people assume a lid keeps the ice fresh. It does the opposite. A lid chills the surface, freezes the top first, and traps everything inside.
Very hard tap water adds its own white haze, since high mineral content has nowhere to go once the water locks solid. Filtering it or using distilled water solves that one cleanly.
And expecting a clear cube from a standard tray in a standard freezer is the mistake that sends people looking for a machine. A household freezer runs cold enough to freeze a tray in two or three hours, which is far too quick for good clarity. Slow freezing is the entire method.
How to Keep Clear Ice Clear
Filtered or distilled water, a loose insulating layer and sanitized molds will improve the result, and none of them require buying a dedicated appliance.
Distilled water removes most of what causes cloudiness, and filtered water gets you most of the way there while tasting better than distilled water on its own. Boiling the water first drives off dissolved gas, which helps, though the effect is much smaller than controlling the freeze direction.
Insulation matters more than water choice. A loose layer around the sides and base slows the freeze without sealing air inside the ice, and sealing is exactly what makes ice cloudy in the first place.
Rinse molds with hot soapy water and dry them completely between batches. Cloudy molds and leftover mineral film on the surface are easy to overlook and hard to correct later.
Skip anything sold as a clear ice pan that promises to do this without insulation, and skip pressing ice at home unless you enjoy the cleanup.
Common Mistakes and How to Fix Them
Work from the symptom, since each one points at a specific cause.
White cloudiness through the middle of the cube
The freeze is happening from every side, so gas and minerals are being trapped in the center. Insulate the sides and base, keep the top open, and use cooler or warmer water at the start of the next batch.
A ring of trapped bubbles around the top
Air got stirred into the water or the freeze was interrupted. Let the water sit for a minute before pouring, and stop opening the freezer door.
A cracked bowl or a shattered block
Thermal shock. Never pour boiling water into cold glass, and never drop a frozen container on a hard surface. Temper the outside with lukewarm water for a few minutes before turning it out.
Ice fused to the container
Water expanded against the walls as it froze and bonded to them. Use silicone or plastic where you can, and run lukewarm water over the outside for a minute before inverting.
A block that froze unevenly, clear on one end and white on the other
The container was not level, or part of it touched something frozen in the freezer. Set the container on a flat surface inside the box and leave a gap on all sides.
For an ordinary drink, the open-container directional freeze on a small tray is the fastest option and the least equipment. For cocktails, the block method is worth the extra day because the cube is large and dense enough to matter. For a party, make two blocks a few days apart so you have a spare while the other is in use.
One habit worth keeping: save the cloudy offcuts separately. Small pieces of rough ice shake a cocktail fast and chill it quickly without over-diluting, which is why home bars keep two kinds on purpose.
Frequently Asked Questions
Can I make clear ice with a regular ice cube tray?
You can get clearer cubes than a store-bought tray gives you, but not much. A tray freezes from every side at once, which traps air and minerals in the middle, and a normal freezer is too cold for a slow freeze. For better results, wrap the tray in a towel, leave the lid off, and let it sit in the back of the freezer where the air circulates. For genuinely clear ice, use an insulated container or make a block.
Is it safe to make ice in a glass bowl?
Yes, with two precautions. Never pour boiling or very hot water into cold glass, because the sudden temperature change can crack it. And avoid dropping a frozen glass bowl on a hard floor when you turn out the ice. Run lukewarm water over the outside for ten to fifteen seconds first, which loosens the ice and warms the glass gently. Silicone and plastic molds avoid both risks entirely.
Why does my ice have a cloudy white center?
Because the water froze from every direction at the same time. Dissolved gases and minerals had nowhere to escape, so they were locked into the middle of the cube as the crystal lattice formed around them. Fast freezing makes it worse. Slow the process by insulating the sides and base of the container and leaving the top open, and the impurities get pushed down and out instead of trapped in the core.
Do I need filtered or distilled water for clear ice?
No, but it helps. Ordinary cold tap water works, especially if the freeze is slow and directional, though hard tap water leaves a mineral haze that filtering removes. Distilled water gives the clearest result and has no chlorine taste when you drink spirits over it. Filtered water is a good middle ground and often tastes better than distilled water on its own.
What is the best clear ice to use for cocktails or parties?
A large block cut into big cubes, made with filtered or distilled water and frozen slowly in an insulated container. Big cubes are dense, melt more slowly and dilute a drink less than tray ice. Cut them roughly two inches for an Old Fashioned and make them longer for tall drinks like a Collins. For a party, freeze a second block a few days ahead and keep both in the freezer until guests arrive.
Conclusion
Start with an open container, cold water, and insulation on the sides and base, then leave it alone for a day or two. That single change, not special water, is what turns cloudy ice into clear ice, and it is the whole of how to make clear ice at home without buying anything.
For everyday drinks, a small insulated tray is enough. For cocktails, freeze a hollow core, fill it, and cut a big block about two inches square. For a party, make two blocks a few days apart and keep the cloudy offcuts for shaking.